

This article is a translation of Benoît Bâlon’s article (fr) concerning the frame creation for Fotowall. I’m translating this article to increase the reach of his work, and meet the ever growing reclamations for more frames.
The few frames proposed as default in Fotowall aren’t always enough to fill up the user’s creativity. Luckily, this software uses only standards, namely SVG for the frames realisation. Thus, it is rather simple to create new frames, though… two little constraints must be respected :
- Drawing an SVG image require the use of a SVG manipulation software, which is not that complicated, but can certainly repel more than one.
- Following a certain amount of indications, once again concerning the SVG, for a perfect display in Fotowall… And there, I lost half my readers (which must represent an arm or a foot)…
Before I suggest a solution to avoid these to constraints, and thus make the integration of a "simple drawing" as a frame in Fotowall easier, we will see how these famous frames works.
As said before, the frames are based on SVG drawings. In order to be used in Fotowall, these are cut in 9 pieces, indentified by a label inside the SVG file. The following illustration represents these 9 pieces, the pink area correspond to the position of a canvas’ photo.
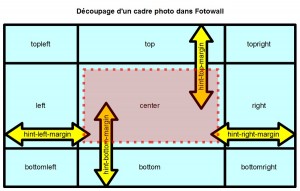
The labels displayed on each piece, such as "topleft" or "bottom", correspond to the different ID on which Fotowall depends on. Without these ID, Fotowall won’t be able to use the frame, and the outline of the photo, be it of your nephew or of Médor, will desperately remains empty. To these 9 pieces, adds up 4 other elements, represented by arrows above. Although they appear while the vectorial drawing is edited, they are invisible inside Fotowall, but are nonetheless necessary. These, identified by the IDs "hint-[...]-margin", are used to define the width of the visible outline. Thus, if we take the example of the left arrow, here is its impact on the left image:
- If the object "hint-left-margin" is as long as the image "left", then this image appears in its whole width
- If the object "hint-left-margin" is longer than the image "left", then a space appears between this image and the border of the photo. This space is automatically filled with the background image "center", which exceed the photo’s from on the left side.
- If the object "hint-left-margin" is less long than the image "left", then the latter is partially covered with the photo.
Mathematically, the distance between the space zone and the covered zone, is the difference of length between the element "hint-[...]-margin" and each of the concerned images (the 3 on the left, right, top, bottom): if the frame is 5 pixels and the margin is 10 pixels, there will be a gap of 5 pixels between the frame and the photo.
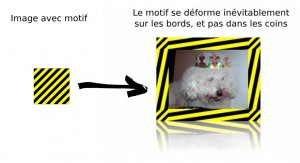
A little detail that is worth mentioning, the images "top", "left", "bottom" and "right" will be automatically stretched according to the photo’s size. From here, we realise that unfortunately it’s hard to come up with a frame composed of pattern supporting to be bent… The following example illustrate rather well this problem. Never mind that ! It’s already possible to do enough to have fun, and these few limitations will probably be lifted with time.
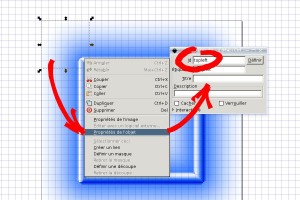
We saw that a frame is composed of 9 + 4 graphical elements in an SVG file. To avoid entering the IDs of these elements manually inside a SVG file (which is a mere XML structured file), in Inkscape it is possible to enter these after a right click on each of these elements, as illustrated below.
With the information we just studied, we can see that creating a frame can me done without to much difficulty, but is nonetheless a tedious work, which can really become a bother when you try to use more colour schemes for a single frame. And, of course, not everyone is confortable with vectorial drawing!
In this case, why not created a bitmap (JPG, PNG…) frame with an image software such as Gimp, and then convert it in an SVG frame ready to use in Fotowall?
As we briefly said before, an SVG file is a mere XML file. Luckily enough, there are plenty of linux command line tools, and Bash (or any other *sh, not to be -too- sectarian) is the star when it come to create files automatically!
The temptation to create such a program was way too high. Thus, here come a
script which will allow us to free ourselves from the cutting and SVG
conversion : fotowall_frame_compiler.zip
Once uncompressed, the use of this script, though requiring the use of a dark and strange screen, the one we call "Terminal", is really simple to use. Just look:
::bash
    ./fotwall_frame_compiler.sh image.png
This script can work with a unique parameter, namely the image to convert. In this case, the 9 frame’s pieces will be as often as possible of equal height and width. For a better rendering, try to prefer dimensions which are multiple of 3 from the begining. In output, the SVG file is created, using the name of the original picture and replacing the extension with ".svg" (which gives in our example image.png > image.svg).
But we can as well have a frame’s outline as high or wide (or both) different from the one reserved to the photo position. Taking back the example of the first illustration, we clearly see that the height of "top" and "bottom" is not the same as the height of "center". In this case, it will be necessary to know the exact size we want to give to "center" once transformed into SVG. In Gimp, it is for instance possible to measure this sone with the rectangular selection tool. Once the height and width are known, we just have to add these two parameters to the script:
::bash
    ./fotowall_frame_compiler.sh image.png 150 130
The first number represents the width in pixels, the second represents the height. Considering that the "center" area is perfectly centred, the script is capable of calculating the width and height of each one of the 9 parts, and to place them within the SVG file. In short, there is nothing left to do, the frame is immediately usable within Fotowall! If the rendering is not perfect (a gap of 1 or 2 pixels is always possible), you just have to play directly on the two values of the command line, and reload the frame in Fotowall.
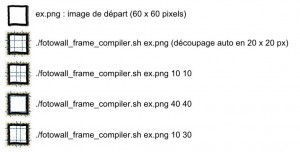
To illustrate all of this, here comes a more concrete example:
However, this script requires one or two programs, which are available within the repository of every good GNU/Linux distribution:
- base64: it should be installed by default, this software can store each of the 9 images directly inside the SVG file.
- ImageMagick : the convert and identify commands are overused in this script. A version 6.5.8-9 at least is required for the automatic splitting in 9 images.
- Inkscape is not really required anymore, but it would be too bad not to use it...
Warning: this script created temporarily 9 PNG images in the directory.
These 9 elements are then stored within the SVG file, after being split and
numbered as follow by ImageMagick (using the example above) : image_0.png,
image_1.png, … , image_8.png. Please mind not having an important picture named
the same, otherwise it will be overwritten. If someone is motivated to create
a proper warning and management of these kind of problems, feel free to do so,
it would be greatly appreciated.
After seeing how the frames works, a script allows us to free ourselves from a certain amount of boring steps (labelling, splitting…), and thus we can concentrate on the pure graphical realisation of the image. Save the images in PNG, as it is the only format to benefit from both colour and transparency.
By way of conclusion, we can summarise the main parts adressed here concerning the Fotowall’s frames:
- They are in SVG format, and can be drawn using one of the vectorial manipulation programs, such as Inkscape.
- A frame is composed of 9 elements : the 4 corners, the 4 borders, and the center. To these 9 elements, adds up 4 others for the distance between the border of the frame and the border of the photo.
- Each of the elements is given a precise ID within the SVG file.
- The borders being stretched, the patterns are bent, which for now put a small limitation on your creativity.
- It is possible to avoid all the SVG part, and created a frame from bitmaps (once again, favour the PNG format) using the script fotowall_frame_compiler (needs GNU/Linux and a recent version of ImageMagik).
A huge thanks to Benoît Bâlon for this article, I hope that my approximative translation didn’t rip too much of the original essence of the article.